
Just Do IT!
[React] react-toastify 사용하기 본문
react-toastify란?
react 프로젝트에서 알람을 만들 수 있도록 해주는 Node.js 패키지
https://github.com/fkhadra/react-toastify
GitHub - fkhadra/react-toastify: React notification made easy 🚀 !
React notification made easy 🚀 ! Contribute to fkhadra/react-toastify development by creating an account on GitHub.
github.com
↑ 위의 깃허브 리드미를 통해 설치 방법을 알 수 있다.
설치하기
npm i react-toastify
사용 방법
깃허브 리드미에 나와있는 예시
  import React from 'react';
  import { toast, ToastContainer } from 'react-toastify';
  import "react-toastify/dist/ReactToastify.css";


  function Example() {
    const notify = () => {
      toast("Default Notification !");

      toast.success("Success Notification !", {
        position: toast.POSITION.TOP_CENTER
      });

      toast.error("Error Notification !", {
        position: toast.POSITION.TOP_LEFT
      });

      toast.warn("Warning Notification !", {
        position: toast.POSITION.BOTTOM_LEFT
      });

      toast.info("Info Notification !", {
        position: toast.POSITION.BOTTOM_CENTER
      });

      toast("Custom Style Notification with css class!", {
        position: toast.POSITION.BOTTOM_RIGHT,
        className: 'foo-bar'
      });
    };

     return (
        <>
          <button onClick={notify}>Notify</button>;
          <ToastContainer />
        </>
      );
  }
다양한 알람
- 성공 알람
- 실패 알람
- 경고 알람
- 정보 알람
toast.info("Lorem ipsum dolor"); // same as toast(message, {type: "info"});
toast.error("Lorem ipsum dolor")
toast.success("Lorem ipsum dolor")
toast.success("Lorem ipsum dolor", {
  theme: "colored"
})
toast.warn("Lorem ipsum dolor")
toast.warn("Lorem ipsum dolor", {
  theme: "dark"
})
알람 세부 설정하기
- <ToastContainer /> 내부에서 설정
<ToastContainer positon="top-center" />- toast 함수에서 설정 가능
const notify = () => toast('nofity!', { position: 'top-center' })
- 세부 설정 옵션
https://fkhadra.github.io/react-toastify/introduction
React-toastify | React-Toastify
[](https://opencollective.com/react-toastify)  투두리스트에 적용해보기
TodoInput.jsx
...
import { toast } from "react-toastify";
import "react-toastify/dist/ReactToastify.css";
...
...
const TodoInput = () => {
...
// onSubmit
const onSubmit = (e) => {
e.preventDefault(); // 새로고침 방지
// 입력칸 공백 방지
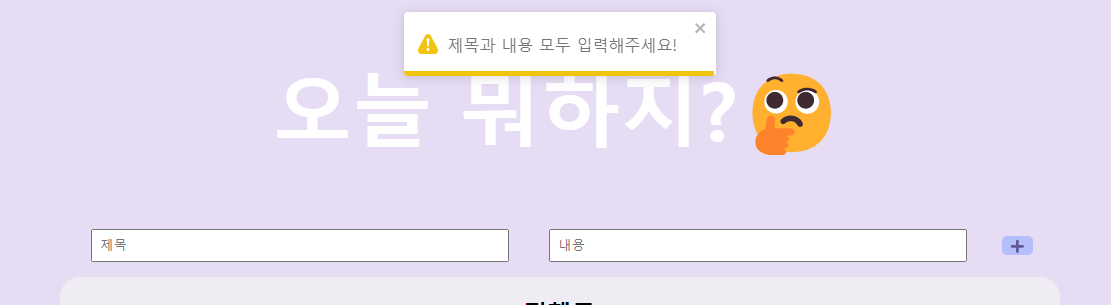
if (!todo.text || !todo.title) {
toast.warning("제목과 내용 모두 입력해주세요!");
return;
}
...
return (
<InputBox>
<InputText
type="text"
name="title"
value={todo.title}
onChange={onChange}
placeholder="제목"
/>
<InputText
type="text"
name="text"
value={todo.text}
onChange={onChange}
placeholder="내용"
/>
<InputBtn type="submit" onClick={onSubmit}>
➕
</InputBtn>
</InputBox>
);
};
export default TodoInput;
app.jsx
import React from "react";
import { ToastContainer } from "react-toastify";
import Router from "./shared/Router";

function App() {
  return (
    <>
      <Router />
      <ToastContainer position={"top-center"} />
    </>
  );
}

export default App;
최상위 컴포넌트에 추가하는 이유?
- 최적화에 좋다
- 큰 프로젝트에서 기획 의도가 바뀔 때 어느 컴포넌트에서든 사용할 수 있도록 최상위 컴포넌트에 추가해야 한다.
입문 과제할 때 튜터님한테 언뜻 듣고 넘어갔던 부분인데, 주말을 이용해서 한번 적용해봤다.
라이브러리가 있지만 실제로 이런 기능을 만드신 분들도 있던데 대단하다....
나도 나중에 조금 더 공부한 다음에 내가 직접 구현해보고 싶다...!
'개발 공부 > React' 카테고리의 다른 글
| [React] Vercel(react) / Glitch(json-server) 배포하기 (0) | 2023.01.05 |
|---|---|
| [React] 스파르타코딩 내일배움캠프 React 심화 내용 정리 (0) | 2022.12.21 |
| [React] React의 생명주기 (LifeCycle) 이해하기 (0) | 2022.12.15 |
| [React] Redux(리덕스) 이해하기 (1) | 2022.12.13 |
| [React] 스파르타코딩 내일배움캠프 React 숙련 내용 정리 (0) | 2022.12.12 |


