
- 분류 전체보기 (395)

Just Do IT!
react-quill로 text-editor 만들어보기 본문
동기와 하는 프로젝트에서 텍스트 에디터를 쓸 일이 생겼다.
아직 UI 구현 단계지만, 텍스트 에디터는 처음 써보는 거라 여러 라이브러리를 두고 고민을 했다.
개발 기간을 그렇게 길게 잡지 않아서 라이브러리를 쓰는 게 적합하다고 생각했고,
그 중 가장 많이 다운받은 (npm trend 기준) react-quill 라이브러리를 적용했다.
react-quill을 선택한 이유는 아래와 같다.
- 깔끔한 UI (custom 가능)
- 사용법이 잘 나와있다 (공식 문서, 여러 블로그 글)
- 이미지 업로드 따로 핸들링 가능 (프로젝트에서 이미지 다중 업로드가 필요하기 때문)
이러한 이유들로 react-draft-wysiwyg와 고민했지만 quill로 결정, 프로젝트에 도입했다.
WYSIWYG란?
What You See Is What You Get, "보는 대로 얻는다"라는 문장의 줄임말이다.
마크다운 형식이 아닌 문서를 편집하는 과정에서 화면에서 그대로 출력해주는 방식이다.
보통 우리가 네이버 블로그를 작성하거나, 티스토리를 작성할 때 나오는 에디터가 바로 이러한 형식이다.
내가 지금 진행하는 프로젝트에서는 일반 사람들이 이용하기 때문에 개발자에게만 친화적인 마크다운 형식이 아니라 그냥 에디터를 사용했어야 했다.
react-quill 라이브러리란?
React 기반의 위지윅 에디터 라이브러리 중 하나로,
Quill.js 라이브러리를 React에서 사용할 수 있도록 wrapping한 것이다.
+) Quill.js : 오픈소스로 제공되며, 최신 웹 기술을 활용하여 구축된 위지윅 에디터이다.
Quill - Your powerful rich text editor
Built for Developers Granular access to the editor's content, changes and events through a simple API. Works consistently and deterministically with JSON as both input and output.
quilljs.com
React-quill 적용하기
1. 설치
npm install react-quill
2. 필수로 import 해줘야 할 것들
import ReactQuill from 'react-quill';
import 'react-quill/dist/quill.snow.css';
3. 기본 예제
import ReactQuill, { Quill } from "react-quill";
import "react-quill/dist/quill.snow.css";

function QuillCustom() {

return (
    <>
      <ReactQuill
        theme="snow"
        value={value}
        onChange={setValue}
        placeholder="내용을 입력하세요."
      />
    </>
  );
이렇게 쉽게 ReactQuill을 하면 기본 형태로 우리가 흔히 보는 에디터가 나오게 된다.
4. modules & formats 추가
modules를 사용하면 quill의 동작과 기능을 사용자가 직접 custom할 수 있다.
formats → Quill은 UI 컨트롤과 API 호출 모두에서 다양한 형식을 지원한다.
기본적으로 모든 형식이 활성화되어 있고 Quill 편집기 내에 존재할 수 있으며 형식 옵션으로 구성할 수 있다.
예시
const formats = [
  'font',
  'header',
  'bold',
  'italic',
  'underline',
  'strike',
  'blockquote',
  'list',
  'bullet',
  'indent',
  'link',
  'align',
  'color',
  'background',
  'size',
  'h1',
];

  const modules = {
    toolbar: [
      [{ font: [] }],
      [{ size: ["small", false, "large", "huge"] }],
      [{ header: [1, 2, 3, false] }],
      [{ color: [] }, { background: [] }],
      ["bold", "italic", "underline", "strike", "blockquote"],
      [
        { list: "ordered" },
        { list: "bullet" },
        { indent: "-1" },
        { indent: "+1" },
      ],
      ["link", "image"],
      ["clean"],
    ],
  };
위와 같은 형식으로 직접 지정해줄 수 있다.
4. 내가 작용한 방식
여기서 나는 toolbar를 직접 custom해서 따로 적용해주었다.
원래는 modules를 정의하고 거기에서 toolbar 메뉴를 직접 지정했는데 스타일을 적용해보니 스타일이 제대로 적용이 안되는 거다. 검색해보기도 하고 직접 콘솔을 열어서 div를 확인해봤는데 toolbar 때문에 에디터 자체가 크기가 밀려서 생기는 오류였다.
그런데 react-quill에서는 직접 toolbar를 custom할 수 있는 기능을 제공해주기에 그렇게 했다.
// EditorToolbar.tsx

const EditorToolbar = () => {
  return (
    <>
      <div className="ql-formats">
        <select className="ql-header" defaultValue="7">
          <option value="1">Header 1</option>
          <option value="2">Header 2</option>
          <option value="3">Header 3</option>
          <option value="4">Header 4</option>
          <option value="5">Header 5</option>
          <option value="6">Header 6</option>
          <option value="7">Normal</option>
        </select>
        <select className="ql-size" defaultValue="medium">
          <option value="small">Small</option>
          <option value="medium">Medium</option>
          <option value="large">Large</option>
          <option value="huge">Huge</option>
        </select>
        <select className="ql-font" defaultValue="sans-serif" />
      </div>
      <div className="ql-formats">
        <button className="ql-bold" />
        <button className="ql-italic" />
        <button className="ql-underline" />
        <button className="ql-strike" />
        <button className="ql-blockquote" />
      </div>

      <div className="ql-formats">
        <button className="ql-list" value="ordered" />
        <button className="ql-list" value="bullet" />
        <button className="ql-indent" value="-1" />
        <button className="ql-indent" value="+1" />
      </div>
      <div className="ql-formats">
        <select className="ql-color" />
        <select className="ql-background" />
        <select className="ql-align" />
      </div>
      <div className="ql-formats">
        <button className="ql-code-block" />
        <button className="ql-link" />
        <button className="ql-image" />
      </div>
    </>
  );
};

export default EditorToolbar;
modules에 지정했던 메뉴들을 지정했다.
ql-formats를 통해 toolbar를 지원해주고 있다.
// EditorComponent.tsx

import { useRef, useState, useMemo } from 'react';
import ReactQuill from 'react-quill';
import 'react-quill/dist/quill.snow.css';
import EditorToolbar from './EditorToolbar';

const EditorComponent = () => {
  const QuillRef = useRef<ReactQuill>();
  const [contents, setContents] = useState('');

  // image 업로드 함수
  const imageHandler = () => {};

  // editor module
  const modules = useMemo(
    () => ({
      toolbar: {
        container: '#toolbar',
        handlers: {
          image: imageHandler,
        },
      },
    }),
    [],
  );

  return (
    <div className="mx-auto max-w-4xl mt-6 mb-6">
      <div id="toolbar">
        <EditorToolbar />
      </div>
      <ReactQuill
        ref={(element) => {
          if (element !== null) {
            QuillRef.current = element;
          }
        }}
        value={contents}
        onChange={setContents}
        modules={modules}
        theme="snow"
        className="bg-white h-[600px] "
      />
    </div>
  );
};

export default EditorComponent;
이렇게 텍스트 에디터를 지정해주었다.
아, 그리고 theme를 적용하지 않으면 화면에 에디터가 보이지 않기 때문에 필수이다.
이미지 핸들러는 직접 구현할 수 있기 때문에 지금은 안했고 나중에 백엔드와 연동 후 구현 예정이다.
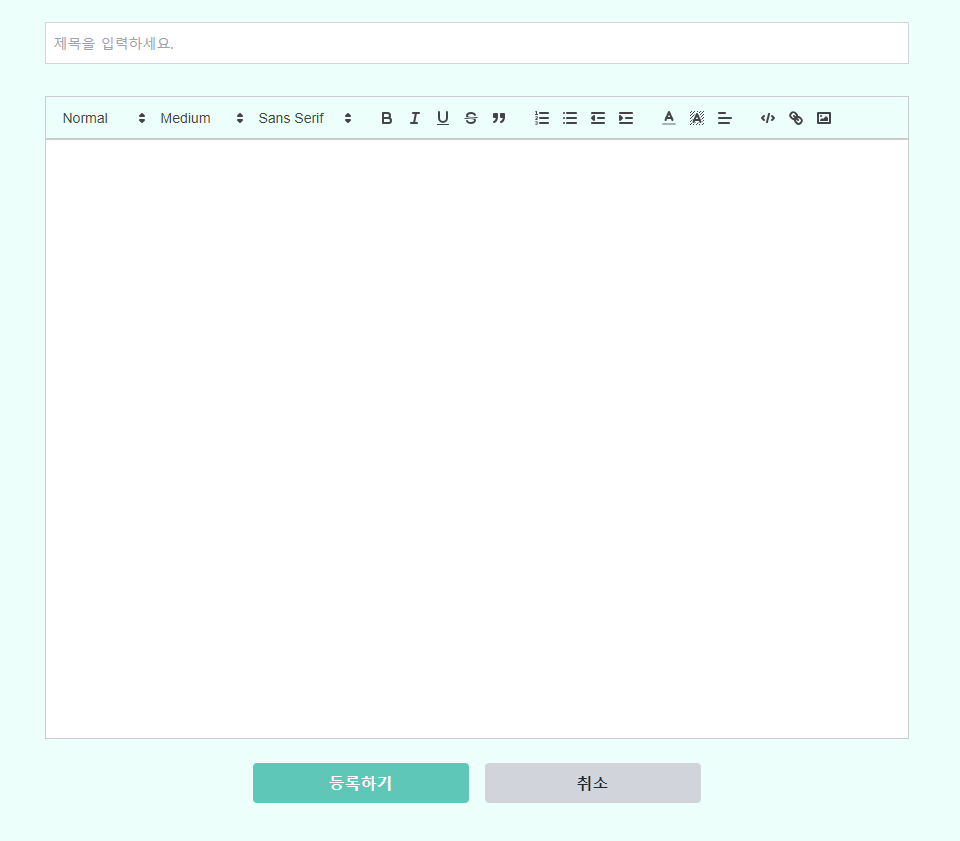
텍스트 에디터가 있더라도 제목 같은 input은 따로 지정해야 하기에 그걸 적용한 글쓰기 페이지이다.
이번에 처음으로 에디터를 써봤는데 신기하고 재밌었다.
여러 기능들을 구현해보는 재미가 있다. 아직 백엔드와 연동 하기 전이고 UI 구현하는 정도지만,
나중에 제대로 기능을 붙이면 어떤 식으로 나오게 될지 기대된다.
아마 오류 기록을 하고 있지 않을까....ㅋㅋㅋ
'개발 공부 > React' 카테고리의 다른 글
| [React] 재사용 가능한 검색창 UI component 만들기 (0) | 2024.10.20 |
|---|---|
| [React] CRA에서 Vite로 마이그레이션 하기 (2) | 2024.10.16 |
| [React] 카카오 우편번호 서비스 API (react-daum-postcode)로 주소 입력받기 (1) | 2024.06.19 |
| [React] useTooltip으로 재사용되는 tooltip 만들기 (2) | 2024.03.18 |
| React에서 .env 파일 사용하기 (0) | 2024.01.08 |


